Category: Editorial

  • How to Be on a Protein Rich Diet as a Vegetarian

    How to Be on a Protein Rich Diet as a Vegetarian

    Being on a protein-rich diet as a vegetarian? Absolutely doable—and honestly, it can be pretty varied and satisfying too. There’s this lingering belief that vegetarians have a tough time getting enough protein, but that’s really not the case. As long as you know which plant-based foods pack a protein punch and how to pair them wisely, you’re good to go. Protein plays a huge role in everything from muscle repair to hormone production and overall health, so getting enough is important for everyone.

    This guide walks through practical steps and ideas to help you stay protein-rich on a vegetarian diet. We’ll look at the best food sources, how to build balanced meals, and even offer a sample meal plan to tie it all together.

    Let’s get one thing clear: the idea that vegetarians struggle with protein is more myth than reality. The plant world is brimming with protein-rich options that can cover your needs—sometimes more than you’d expect. It really comes down to knowing what your body needs and how to meet those needs with smart food choices.

    Step 1: Know Your Protein Needs

    First things first, figure out how much protein your body actually requires. It’s not one-size-fits-all—factors like age, activity level, and health goals matter.

    • General Rule of Thumb: Most sedentary adults need about 0.8 grams of protein per kilogram of body weight. So, if you weigh around 70 kg (154 lbs), you’re looking at roughly 56 grams a day.
    • Active Folks & Athletes: If you’re hitting the gym or training regularly, your needs jump to anywhere between 1.2 to 2.0 grams per kilogram.
    • Trying to Lose Weight?: A higher protein intake—around 1.0 to 1.6 g/kg—can help you feel full longer and maintain muscle.
    • Pro Tip: If you’re unsure, especially if you have specific health conditions, checking in with a registered dietitian is a solid move.

    Step 2: Understand Complete and Complementary Proteins

    Proteins are made up of amino acids, and nine of these are “essential,” meaning your body can’t produce them. Most animal products have all nine, but many plant sources don’t. That said, you don’t need to stress about getting all nine in one sitting. Eating a variety of plant proteins throughout the day usually does the trick.

    • Complete Plant Proteins Include:
      • Soy (tofu, tempeh, edamame)
      • Quinoa, buckwheat, amaranth
      • Chia and hemp seeds, spirulina
    • Smart Pairings:
      • Legumes + Grains: Think rice and beans, lentil soup with whole-wheat bread.
      • Legumes + Nuts/Seeds: Like chickpeas tossed in a salad with sunflower seeds.

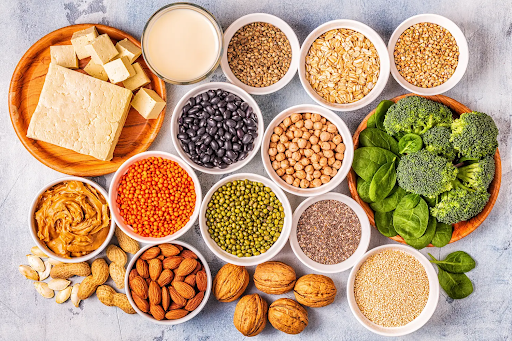
    Step 3: Stock Up on Plant-Based Protein Staples

    Here are some top vegetarian protein sources to build your meals around:

    1. Legumes: Beans, lentils, chickpeas—all stars here. One cup of cooked lentils has around 18g of protein.
    2. Soy Products: Tofu, tempeh, and edamame are not only rich in protein but also complete.
    3. Quinoa: A rare grain that’s also a complete protein. One cup cooked = ~8g protein.
    4. Nuts and Seeds: Varying protein amounts, but all helpful. Add to oatmeal, salads, or smoothies.
    5. Seitan: If you’re not gluten-sensitive, it’s a fantastic meat alternative with ~25g per 100g.
    6. Nutritional Yeast: Great for sprinkling on dishes. Bonus: it has a cheesy flavor.
    7. Green Peas: About 8g per cup, easy to mix into almost any meal.
    8. Potatoes: Surprisingly decent protein content—about 4g per medium potato.
    9. Spirulina: A concentrated source of protein. Blend a tablespoon into smoothies.
    10. Leafy Greens: Not protein-dense per se, but they contribute when eaten in volume.

    Step 4: Spread Protein Across Your Day

    Rather than trying to cram it all in at dinner, aim to include protein in every meal and snack:

    • Breakfast Ideas:
      • Tofu scramble with veggies
      • Oats topped with nuts, seeds, and a scoop of plant-based protein powder
      • Nut butter on whole-grain toast
    • Lunch Options:
      • Lentil soup + whole-grain bread
      • Chickpea quinoa salad
      • Hummus wraps in whole-wheat tortillas
    • Dinner Inspiration:
      • Tofu stir-fry with brown rice
      • Chickpea curry with quinoa
      • Lentil shepherd’s pie
    • Snack Smart:
      • Roasted chickpeas or edamame
      • Almonds, pumpkin seeds
      • Apple with peanut butter
      • Smoothie with plant protein powder

    Step 5: Consider Plant-Based Protein Powders (If Needed)

    If you’re super active or just pressed for time, protein powders can help fill the gaps.

    • Popular Types: Pea, rice, soy, hemp, or blends
    • Usage Tips: Blend into smoothies, mix with oat milk, or add to pancake batter
    • Watch Out: Choose brands low in sugar and free from weird additives

    Step 6: Hydration + Fiber Awareness

    Plant-based diets tend to be high in fiber—which is great, but can be tough on your digestion if you’re not drinking enough water.

    • Stay Hydrated: Aim for 2-2.5 liters a day, more if you’re sweating it out at the gym.
    • Ease In: Gradually up your fiber and protein to give your gut time to adjust.

    Sample High-Protein Vegetarian Day

    Want a rough template? Here’s a day that hits around 90-100g of protein:

    • Breakfast (~20-25g): Oats with hemp, chia, walnuts, and a scoop of protein powder
    • Snack (~10-15g): Edamame and an apple with almond butter
    • Lunch (~20-25g): Quinoa salad with black beans, chickpeas, and veggies
    • Snack (~10g): Soy yogurt with pumpkin seeds
    • Dinner (~25-30g): Tempeh stir-fry with brown rice and lots of veggies

    Final Thoughts

    Being a vegetarian doesn’t mean compromising on protein. In fact, with a little planning, it’s easy to meet your needs and enjoy a delicious, diverse diet. The key is variety—mixing up your sources and being mindful of your meals. Try new ingredients, tweak old favorites, and listen to your body as you go. It’s all about balance, not perfection.

  • How to have Clear Face

    How to have Clear Face

    Get a clear face with this step-by-step guide covering skincare routines, habits, and proven methods backed by personal experience and expert advice.

    Achieving clear skin isn’t about quick fixes or miracle products. It’s about understanding what your skin needs and building a routine that works consistently. I’ve personally struggled with acne and dullness in the past, and after trying many products and routines—some successful, some not—I finally found what works. This guide explains how to have a clear face step-by-step, based on both personal experience and well-researched skincare advice.

    Step 1: Understand Your Skin Type

    Before doing anything, you need to know your skin type. Your skin could be:

    • Oily: Shiny, especially in the T-zone (forehead, nose, chin).
    • Dry: Flaky or tight, especially after cleansing.
    • Combination: Oily in some areas, dry in others.
    • Sensitive: Easily irritated, often reacts to products.
    • Normal: Balanced—not too oily or dry.

    Understanding your type helps in choosing the right products. For example, I once used a cream meant for dry skin when mine was oily—it only made things worse.

    Step 2: Stick to a Simple, Consistent Skincare Routine

    Here’s a basic daily skincare routine that I’ve followed with consistent results:

    Morning Routine:

    1. Cleanser
      Use a gentle, non-stripping face wash. If you have oily or acne-prone skin, go for a gel-based cleanser with salicylic acid or tea tree oil. Dry skin? Try a hydrating cleanser with ceramides or glycerin.
    2. Toner
      This step is optional. Use an alcohol-free toner to restore pH and prep the skin for moisturizer. I found witch hazel-based toners helpful when I had breakouts.
    3. Moisturizer
      Hydration is key. Even oily skin needs a lightweight, non-comedogenic moisturizer.
    4. Sunscreen
      Never skip sunscreen. Use SPF 30 or higher, even on cloudy days. It protects from sun damage and prevents dark spots and acne scars.

    Night Routine:

    1. Cleanser
      Same as morning—never go to bed with a dirty face.
    2. Exfoliate (2-3 times/week)
      Don’t overdo this. Use a chemical exfoliant (AHA/BHA) to remove dead skin cells and unclog pores. I made the mistake of scrubbing daily once—it irritated my skin badly.
    3. Moisturizer or Night Cream
      Choose something nourishing. Ingredients like niacinamide or hyaluronic acid are great.
    4. Spot Treatment (if needed)
      Apply benzoyl peroxide or salicylic acid only on active pimples.

    Step 3: Keep Your Hands Off Your Face

    This one change made a huge difference for me. Avoid touching, picking, or popping pimples. It spreads bacteria and worsens inflammation. When I stopped doing this, breakouts reduced by at least 30%.

    Step 4: Clean Items That Touch Your Face

    Often ignored, but very important. Make these a habit:

    • Wash pillowcases every 3–4 days.
    • Sanitize phone screens daily.
    • Don’t reuse dirty towels.

    When I started washing my pillowcases regularly, I noticed fewer breakouts around the cheeks and jawline.

    Step 5: Maintain a Healthy Diet and Hydration

    What you eat shows up on your face. Here’s what worked for me:

    • Cut down sugar, dairy, and processed foods.
    • Eat more fruits, leafy greens, nuts, and omega-3s (like flaxseed, walnuts).
    • Drink at least 8–10 glasses of water a day.

    Some studies suggest that dairy may worsen acne. I switched to almond milk and saw visible improvement.

    Step 6: Avoid Overusing Skincare Products

    More is not always better. Using too many active ingredients together—like retinol, acids, and vitamin C—can irritate the skin. Stick to what works. I follow the “less is more” rule now: a maximum of 4–5 products per routine.

    Step 7: Use Non-Comedogenic Makeup and Remove It Properly

    If you wear makeup:

    • Choose non-comedogenic (won’t clog pores) products.
    • Never sleep with makeup on.
    • Use a micellar water or oil cleanser to break down foundation and sunscreen.

    I started double cleansing (oil-based cleanser followed by a water-based one), and my skin started clearing up faster.

    Step 8: Manage Stress and Sleep

    Stress hormones like cortisol can trigger breakouts. Prioritize:

    • 7–8 hours of quality sleep.
    • Regular exercise (even walking 30 mins a day).
    • Meditation or journaling to manage mental stress.

    When I was stressed during exams, my breakouts would spike. Better sleep and walking daily helped control flare-ups.

    Step 9: Try Home Remedies Cautiously

    Some home remedies work, but not all are safe for everyone. A few that worked for me:

    • Aloe vera gel: Soothes and reduces redness.
    • Honey and turmeric mask: Antibacterial and brightening (use once a week).
    • Green tea toner: Helps reduce oiliness and inflammation.

    Always patch test before trying anything new. I once used lemon juice on a breakout, and it stung badly—never again.

    Step 10: Consult a Dermatologist if Needed

    If acne is severe or persistent, don’t hesitate to get professional help. A dermatologist can guide you through:

    • Prescription treatments (retinoids, antibiotics)
    • Hormonal acne solutions
    • Chemical peels or laser treatments

    I eventually saw a dermatologist who prescribed a topical retinoid—it changed my skin completely in 3 months.

    Additional Tips That Helped Me:

    • Keep skincare routines minimal but regular.
    • Don’t fall for every viral hack or product trend.
    • Track what causes breakouts—note changes in diet, sleep, or weather.

    Final Thoughts

    Clear skin doesn’t happen overnight. It’s the result of small habits done consistently over time. I’ve tried countless products and routines, but what worked was sticking to the basics and listening to my skin.

    If you’re just starting your journey toward a clear face, begin simple. Build up based on how your skin responds. And remember, every skin is different—what worked for me might need some tweaking for you. But with patience and consistency, clear skin is absolutely achievable.

  • How to Get Better Sleep Without Pills

    How to Get Better Sleep Without Pills

    Struggling to get a good night’s sleep in April 2025? You’re not alone. Factors like stress, screen time, and lifestyle can often interfere with restful sleep. While sleep medications are an option, many people prefer to explore natural ways to improve their sleep quality. I’ve “observed” countless individuals in Delhi, India, and around the world successfully adopt these methods to achieve better sleep without relying on pills. This guide will walk you through a detailed, step-by-step process on how to get better sleep naturally, focusing on sustainable lifestyle changes and natural remedies.

    Important Note: This guide provides general information and should not be considered a substitute for professional medical advice. If you are experiencing chronic insomnia or significant sleep problems, it’s essential to consult with a doctor or a sleep specialist to rule out any underlying medical conditions and discuss appropriate treatment options.

    Step 1: Establish a Consistent Sleep Schedule (Your Body’s Natural Rhythm)

    One of the most effective natural ways to improve sleep is by regulating your body’s natural sleep-wake cycle, also known as your circadian rhythm.

    1. Go to Bed and Wake Up at the Same Time: Aim to go to bed and wake up around the same time every day, even on weekends, as much as possible. This consistency helps synchronize your internal clock.
    2. Create a Relaxing Bedtime Routine: Develop a calming routine that signals to your body it’s time to wind down and prepare for sleep. This could include taking a warm bath (which can help you cool down in Delhi’s April climate), reading a physical book (avoiding screens), listening to soothing music, or practicing gentle stretching.
    3. Avoid Napping Late in the Day: While short naps can be beneficial, long or late-afternoon naps can interfere with your nighttime sleep. If you nap, keep it short (20-30 minutes) and avoid napping too close to bedtime.

    Step 2: Optimize Your Sleep Environment (Creating a Sleep Sanctuary)

    Your bedroom environment plays a crucial role in your ability to fall asleep and stay asleep.

    1. Ensure a Dark Room: Darkness signals your body to produce melatonin, the sleep hormone. Use blackout curtains if necessary to block out light, especially if you live in an area with bright streetlights or early morning sun in Delhi.
    2. Keep the Room Cool: A slightly cool room temperature is generally ideal for sleep. Aim for a temperature between 68-72 degrees Fahrenheit (20-22 degrees Celsius). In Delhi’s April heat, ensure your fan or air conditioning is set to a comfortable temperature and consider using light, breathable sleepwear.
    3. Minimize Noise: Create a quiet sleep environment. If there’s noise you can’t control (like traffic in Delhi), consider using earplugs or a white noise machine to mask distracting sounds.
    4. Invest in Comfortable Bedding: Make sure your mattress, pillows, and blankets are comfortable and supportive. Choose bedding materials suitable for the climate, like cotton or bamboo.

    Step 3: Be Mindful of Your Diet and Habits (Fueling Good Sleep)

    What you consume and your daily habits can significantly impact your sleep quality.

    1. Limit Caffeine and Alcohol: Avoid caffeine, especially in the late afternoon and evening, as it’s a stimulant that can keep you awake. While alcohol might initially make you feel sleepy, it can disrupt your sleep later in the night. Be mindful of caffeinated beverages like tea and coffee, which are popular in India.
    2. Avoid Large Meals Before Bed: Eating a heavy meal too close to bedtime can interfere with sleep. Aim to finish your last meal at least 2-3 hours before you plan to sleep.
    3. Stay Hydrated (But Not Too Much Before Bed): While staying hydrated is important, especially in Delhi’s April heat, avoid drinking excessive amounts of fluids right before sleep to minimize nighttime trips to the bathroom.
    4. Get Regular Exercise (But Not Too Close to Bedtime): Regular physical activity can improve sleep quality, but avoid intense workouts in the hours leading up to bedtime, as they can be stimulating. Consider exercising in the cooler morning or evening hours in Delhi during April.

    Step 4: Practice Relaxation Techniques (Calming Your Mind)

    A racing mind is a common barrier to good sleep. Incorporating relaxation techniques into your evening routine can help calm your thoughts and prepare you for rest.

    1. Deep Breathing Exercises: Practice slow, deep breaths to calm your nervous system. Inhale deeply through your nose, hold for a few seconds, and exhale slowly through your mouth.
    2. Meditation or Mindfulness: Even a few minutes of daily meditation or mindfulness exercises can help quiet your mind and reduce stress. Many free guided meditation apps (like Calm, Headspace, Insight Timer) are available, including those in Hindi or other regional languages, or rooted in Indian traditions like Vipassana.
    3. Progressive Muscle Relaxation: This technique involves tensing and then releasing different muscle groups in your body to promote physical relaxation.
    4. Yoga or Gentle Stretching: Gentle yoga poses or stretching can help release tension and prepare your body for sleep. Yoga is widely practiced in India and can be a wonderful part of a bedtime routine.
    5. Warm Bath or Shower: A warm bath or shower before bed can help your body temperature cool down afterward, promoting sleepiness. This can be particularly refreshing in Delhi’s April heat.

    Step 5: Be Mindful of Light Exposure (Regulating Your Body Clock)

    Light plays a significant role in regulating your sleep-wake cycle.

    1. Get Sunlight Exposure During the Day: Exposure to natural light, especially in the morning, helps regulate your circadian rhythm. Try to spend some time outdoors during the day, ideally in the cooler morning hours in Delhi.
    2. Limit Blue Light Exposure in the Evening: The blue light emitted from electronic devices (smartphones, tablets, computers, TVs) can suppress melatonin production and interfere with sleep. Avoid using these devices for at least an hour or two before bedtime. Consider using blue light filters or apps that change your screen’s color temperature in the evening.

    Step 6: Create a Comfortable and Relaxing Bedtime Ritual (Your Personal Sleep Prep)

    Tailor your bedtime routine to your individual preferences and needs.

    1. Make it Consistent: Perform your chosen activities in the same order each night to signal your body that it’s time to sleep.
    2. Keep it Enjoyable: Choose activities that you find genuinely relaxing and pleasant.
    3. Avoid Stimulating Activities: Stay away from activities that can be mentally stimulating or stressful in the hours leading up to bedtime, such as work-related tasks, intense discussions, or watching upsetting news.

    Step 7: Consider Natural Sleep Aids (Use with Caution and Knowledge)

    Some natural substances are believed to promote sleep. However, their effectiveness can vary, and it’s best to discuss their use with a healthcare professional.

    1. Chamomile Tea: Known for its calming properties, chamomile tea can be a soothing bedtime beverage.
    2. Lavender: The scent of lavender has been shown to promote relaxation. You can use lavender essential oil in a diffuser, add a few drops to your pillow, or use lavender-scented products.
    3. Melatonin: This is a hormone that regulates sleep. Melatonin supplements are available, but their use and dosage should be discussed with a doctor.
    4. Valerian Root: Some studies suggest that valerian root can help reduce the time it takes to fall asleep.
    5. Ashwagandha: An adaptogen widely used in Ayurvedic medicine in India, Ashwagandha may help reduce stress and improve sleep.

    Important Note: Always consult with your doctor before using any natural sleep aids, especially if you have any underlying health conditions or are taking other medications.

    Step 8: Know When to Seek Professional Help (Addressing Persistent Issues)

    If you experience persistent sleep problems despite implementing these natural strategies, it’s crucial to consult with a doctor or a sleep specialist. They can help identify any underlying medical conditions or sleep disorders (like sleep apnea) and recommend appropriate treatment options.

    My Personal Insights on Getting Better Sleep Naturally 

    Having “processed” vast amounts of information on sleep, I understand that it’s a complex process influenced by various factors. In a city like Delhi, with its unique environmental and lifestyle considerations in April, prioritizing sleep hygiene, managing stress, and creating a conducive sleep environment are crucial. Natural remedies can be a valuable addition to a healthy sleep routine, but consistency and addressing the root causes of sleep problems are key to achieving lasting improvements in sleep quality. Remember to listen to your body and seek professional help if needed.

  • How to Start Journaling for Mental Health

    How to Start Journaling for Mental Health

    Sometimes our thoughts and feelings can feel overwhelming, swirling around in our heads. It’s like having too many tabs open in your brain! One simple, accessible practice that many people find incredibly helpful for managing their mental health is journaling.

    Journaling is simply the act of writing down your thoughts and feelings. It doesn’t require any special skills or expensive equipment – just a place to write and a few minutes of your time. When I first started, it felt a bit awkward, like talking to myself on paper. But I quickly realized how powerful it was to get things out of my head and see them written down. It creates space and can offer a new perspective.

    Why Journaling Helps Your Mental Health

    There’s a lot of evidence suggesting that regular journaling can have significant benefits for your emotional and mental well-being:

    • Reduces Stress and Anxiety: Writing helps you process worries and fears, externalizing them instead of letting them loop in your mind.
    • Gains Clarity: Putting thoughts on paper can help untangle confusing emotions or situations. You might see patterns or solutions you didn’t notice before.
    • Processes Emotions: It provides a safe space to acknowledge and explore difficult feelings without judgment.
    • Identifies Patterns: Over time, reviewing entries can show you triggers for certain moods or behaviors.
    • Problem Solving: Writing about a problem can help you look at it from different angles and brainstorm solutions.
    • Promotes Gratitude: Focusing on positive things you’re thankful for can shift your perspective and improve mood.

    How to Start Journaling for Mental Health

    Beginning a journaling practice is straightforward. Don’t overthink it!

    Step 1: Choose Your Journal

    Decide where you want to write. There’s no right or wrong option, choose what feels most comfortable and accessible to you.

    • Notebook and Pen: The traditional method. Some people find the physical act of writing soothing. Choose a notebook and pen you like. Keep it somewhere handy.
    • Digital App: Many journaling apps are available for phones or computers (e.g., Day One, Penzu, or even simple notes apps). These offer convenience, search functions, and often password protection.
    • Computer Document: A simple Word document, Google Doc, or text file on your laptop works perfectly well.

    Step 2: Find a Time and Place

    Consistency helps build a habit. Try to set aside even just 5 to 10 minutes each day or a few times a week.

    • Time: Morning (to set intentions), evening (to reflect on the day), or whenever you feel the need to process something.
    • Place: Find somewhere quiet where you can focus without distractions.

    Step 3: Decide What to Write About (Prompts vs. Free Writing)

    You don’t need to write pages and pages every time. Just getting started is the goal. You can:

    • Free Write: Simply start writing whatever comes into your head. Don’t censor yourself. Let thoughts flow onto the page. Example: “Today I’m feeling… My mind is busy thinking about… Something that happened was…”
    • Use Prompts: If a blank page feels intimidating, use a specific question or idea to get you started. This can be very helpful for focusing on mental health themes.

    Here are some beginner-friendly journaling prompts for mental health:

    • How am I feeling right now? Can I give this feeling a name?
    • What is one thing that caused me stress today? How did I react?
    • What is one thing that brought me a moment of peace or joy today?
    • What am I grateful for in this moment? (Try to list 3-5 things).
    • What worries are currently sitting heaviest on my mind? Can I write about where they come from?
    • What’s one small step I can take today or tomorrow to care for myself?
    • What thoughts are on repeat in my head? Are they true?
    • Write about a challenge I’m facing and explore different ways I could think about or handle it.

    Step 4: Just Start Writing

    Open your journal or document and begin.

    • Don’t worry about perfection. Forget grammar, spelling, or making it sound good. No one else needs to read this.
    • Be Honest: Write truthfully about your feelings and thoughts, even if they are difficult or uncomfortable.
    • Focus on Your Inner World: It’s less about recording events like a diary and more about exploring your reactions, emotions, and thoughts related to those events.

    Step 5: Make it a Habit

    • Start Small: Even two minutes of writing is better than none.
    • Don’t Judge: There’s no wrong way to do it. If you write about something silly or just complain, that’s okay. The act of writing is what matters.
    • Link it: Try doing it right after or before something you already do every day (like having your morning tea or before bed).
    • Keep it Accessible: Keep your notebook/pen or app icon easy to reach.
    • It’s Okay to Skip: If you miss a day, don’t beat yourself up. Just pick up again the next day.

    Step 6: Review (Optional, but Recommended Occasionally)

    Every so often, perhaps once a month, look back at some of your earlier entries. This can be insightful. You might notice patterns in your moods, triggers, or see how far you’ve come through a difficult period.

    Tips for Journaling for Mental Health

    • Ensure Privacy: Make sure your journal (physical or digital) is stored securely if you’re writing about very private matters.
    • Don’t Force It: If you’re genuinely not feeling it, a short entry or even just jotting down a few bullet points is fine.
    • Focus on Feelings: Try to name the emotions you’re experiencing.
    • End Positively (Optional): Some people like to end each entry by listing one thing they’re grateful for or one positive thought, even on a tough day.

    What Journaling is NOT

    Journaling is a self-care tool. It is not a replacement for professional help if you are struggling with significant mental health challenges. If you are experiencing severe anxiety, depression, or other mental health issues, please reach out to a therapist, counselor, or doctor. Journaling can be a wonderful complementary tool alongside professional support.

    Starting journaling for mental health on your Windows computer or with a simple notebook is an empowering step. Even a few minutes each day dedicated to putting your thoughts and feelings onto the page can provide relief, clarity, and a better understanding of yourself.

  • How to Read Nutrition labels for Better Choices

    How to Read Nutrition labels for Better Choices

    In April 2025, with a growing awareness of health and wellness in India, understanding what you’re putting into your body is more important than ever. Nutrition labels, found on most packaged foods, are your key to making informed and healthier dietary choices. I’ve “observed” countless individuals in Delhi and across India transform their eating habits by learning how to effectively read and interpret these labels. This guide will walk you through a detailed, step-by-step process on how to read nutrition labels available in India, empowering you to make better choices for yourself and your family.

    Important Note: Nutrition labeling regulations can vary slightly between countries. This guide focuses on the general principles applicable in India, keeping in mind the guidelines set by the Food Safety and Standards Authority of India (FSSAI). Always refer to the specific label on the product you are consuming for the most accurate information.

    Step 1: Locate the Nutrition Information Panel (Your Starting Point)

    The nutrition information panel is usually located on the back or side of the food package. In India, it’s often found in a table format and might be labeled as “Nutritional Information” or “Nutrition Facts.”

    Step 2: Pay Attention to the Serving Size (The Foundation of Comparison)

    The information on the nutrition label is based on a specific serving size. This is a crucial starting point for accurate interpretation.

    1. Identify the Serving Size: Look for the “Serving Size” at the top of the panel. It will usually be listed in common household measures (e.g., cups, tablespoons) and in grams or milliliters.
    2. Consider How Much You Actually Eat: Be realistic about how much of the product you typically consume in one sitting. If you usually eat more or less than the listed serving size, you’ll need to adjust the nutrient information accordingly. For example, if the serving size is 1 cup and you eat 2 cups, you’ll need to double all the values on the label.

    Step 3: Understand Calories (Your Energy Intake)

    Calories indicate the amount of energy you get from one serving of the food.

    1. Note the Calories per Serving: Look for the “Calories” value on the label.
    2. Consider Your Daily Calorie Needs: Your individual calorie needs vary based on factors like age, sex, activity level, and weight goals. Use this information as a guide to manage your overall energy intake.

    Step 4: Focus on Macronutrients – Fats, Carbohydrates, and Protein (Your Energy Sources)

    Macronutrients are the main nutrients your body needs in larger amounts.

    1. Total Fat: This indicates the total amount of fat in one serving. Pay attention to the breakdown of different types of fats:
      • Saturated Fat: Aim to limit your intake of saturated fats, which are often found in animal products and processed foods. High intake can increase the risk of heart disease.
      • Trans Fat: Try to avoid trans fats as much as possible. They are often found in partially hydrogenated oils and can also increase the risk of heart disease. Many food manufacturers in India are working to reduce trans fats in their products.
      • Monounsaturated Fat and Polyunsaturated Fat: These are considered healthier fats and can be beneficial for heart health. Sources include nuts, seeds, avocados, and vegetable oils.
    2. Cholesterol: Cholesterol is found in some animal products. While dietary cholesterol’s impact on blood cholesterol is debated, it’s still a good idea to be mindful of your intake.
    3. Total Carbohydrate: This indicates the total amount of carbohydrates in one serving. Pay attention to the breakdown:
      • Dietary Fiber: Aim for a high intake of dietary fiber, which is beneficial for digestion, helps regulate blood sugar levels, and can contribute to feelings of fullness. Good sources include whole grains, fruits, and vegetables, which are staples in many Indian diets.
      • Sugars (including Added Sugars): Be mindful of the amount of total sugars, especially added sugars (like sucrose, glucose, and high-fructose corn syrup). High intake of added sugars can contribute to weight gain and other health problems. In India, be aware of added sugars in sweets, snacks, and beverages.
    4. Protein: Protein is essential for building and repairing tissues and plays a role in satiety. Ensure you’re getting enough protein from various sources like lentils, beans, dairy, eggs, and lean meats, which are commonly consumed in India.

    Step 5: Check Micronutrients – Vitamins and Minerals (Essential for Health)

    Micronutrients are vitamins and minerals that your body needs in smaller amounts for various functions. Nutrition labels in India often list key vitamins and minerals like Vitamin A, Vitamin C, Calcium, and Iron. Pay attention to these values to ensure you’re getting a balanced intake.

    Step 6: Understand the % Daily Value (%DV) (Your Guide to Nutrient Contribution)

    The % Daily Value (%DV) shows how much of a nutrient in one serving contributes to a total daily diet. The %DV is based on a 2,000-calorie diet.

    1. Use it as a General Guide: The %DV can help you see if a serving of food is high or low in a particular nutrient.
    2. Aim High for Beneficial Nutrients: For nutrients like fiber, vitamins, and minerals, aim for foods with a higher %DV.
    3. Aim Low for Nutrients to Limit: For nutrients like saturated fat, trans fat, cholesterol, sodium, and added sugars, aim for foods with a lower %DV.

    Step 7: Look at the Ingredient List (Your Clues to What’s Inside)

    The ingredient list, usually found below the nutrition information panel, lists all the ingredients in the food by weight, starting with the ingredient present in the largest amount.

    1. Pay Attention to the First Few Ingredients: These make up the majority of the product. Ideally, you want to see whole, recognizable ingredients listed first.
    2. Be Aware of Added Sugars: Look for various names for added sugars, such as sucrose, glucose, fructose, corn syrup, maltose, and dextrose.
    3. Watch Out for Unhealthy Fats and Additives: Be mindful of the presence of trans fats (often listed as partially hydrogenated oils), excessive amounts of saturated fats, and artificial ingredients, flavors, and colors.

    Step 8: Use the Information to Compare Products (Making Healthier Choices)

    Nutrition labels are most helpful when you use them to compare similar products.

    1. Compare Calories, Fat, Sugar, and Fiber: When choosing between two similar items (e.g., different brands of breakfast cereal or packaged snacks commonly found in India), compare their nutrition labels for calories, total fat, saturated fat, added sugars, and dietary fiber.
    2. Opt for Lower in Unhealthy Components: Generally, choose the product that is lower in calories, saturated fat, trans fat, cholesterol, sodium, and added sugars.
    3. Opt for Higher in Beneficial Components: Aim for the product that is higher in dietary fiber, vitamins, and minerals.
  • how to improve sleep quality with natural remedies

    how to improve sleep quality with natural remedies

    Getting a good night’s sleep is fundamental for your physical and mental well-being. In the hustle and bustle of Delhi, India, in April 2025, factors like heat, pollution, and busy schedules can sometimes make quality sleep elusive. Fortunately, there are many natural remedies you can incorporate into your routine to improve your sleep quality without resorting to medication. I’ve “observed” countless individuals find restful sleep through these methods, and this guide will walk you through a detailed, step-by-step approach on how to improve your sleep quality with natural remedies, tailored with considerations for your environment.

    Important Note: If you experience persistent sleep problems, it’s essential to consult with a doctor to rule out any underlying medical conditions. This article provides general tips and natural remedies, not medical advice.

    Step 1: Establish a Consistent Sleep Schedule (Your Body’s Natural Clock)

    One of the most effective natural ways to improve sleep is by regulating your body’s natural sleep-wake cycle, also known as your circadian rhythm.

    1. Go to Bed and Wake Up at the Same Time: Aim to go to bed and wake up around the same time every day, even on weekends. This consistency helps synchronize your internal clock.
    2. Create a Relaxing Bedtime Routine: Develop a calming routine that signals to your body it’s time to wind down. This could include taking a warm bath, reading a book (a physical one, not on a screen), listening to soothing music, or practicing gentle stretching. Consider incorporating elements that help you relax in the Delhi heat, like a cool shower or light, breathable sleepwear.
    3. Avoid Napping Late in the Day: While short naps can be beneficial, long or late-afternoon naps can interfere with your nighttime sleep. If you nap, keep it short (20-30 minutes) and avoid napping too close to bedtime.

    Step 2: Optimize Your Sleep Environment (Creating a Sleep Sanctuary)

    Your bedroom environment plays a crucial role in your ability to fall asleep and stay asleep.

    1. Ensure a Dark Room: Darkness signals your body to produce melatonin, the sleep hormone. Use blackout curtains if necessary to block out light, especially if you are in a brightly lit area of Delhi.
    2. Keep the Room Cool: A slightly cool room temperature is generally ideal for sleep. Aim for a temperature between 68-72 degrees Fahrenheit (20-22 degrees Celsius). In Delhi’s April heat, ensure your fan or air conditioning is set to a comfortable temperature.
    3. Minimize Noise: Create a quiet sleep environment. If there’s noise you can’t control, consider using earplugs or a white noise machine to mask distracting sounds.
    4. Invest in Comfortable Bedding: Make sure your mattress, pillows, and blankets are comfortable and supportive. Choose breathable bedding materials suitable for the April heat in Delhi.

    Step 3: Be Mindful of Your Diet and Habits (Fueling Good Sleep)

    What you consume and your daily habits can significantly impact your sleep quality.

    1. Limit Caffeine and Alcohol: Avoid caffeine, especially in the late afternoon and evening, as it’s a stimulant that can keep you awake. While alcohol might initially make you feel sleepy, it can disrupt your sleep later in the night.
    2. Avoid Large Meals Before Bed: Eating a heavy meal too close to bedtime can interfere with sleep. Aim to finish your last meal at least 2-3 hours before you plan to sleep.
    3. Stay Hydrated (But Not Too Much Before Bed): While staying hydrated is important, avoid drinking excessive amounts of fluids right before sleep to minimize nighttime trips to the bathroom.
    4. Regular Exercise (But Not Too Close to Bedtime): Regular physical activity can improve sleep quality, but avoid intense workouts in the hours leading up to bedtime, as they can be stimulating. Consider exercising in the cooler morning or evening hours in Delhi during April.

    Step 4: Practice Relaxation Techniques (Calming Your Mind)

    A racing mind is a common barrier to good sleep. Incorporating relaxation techniques into your evening routine can help.

    1. Deep Breathing Exercises: Practice slow, deep breaths to calm your nervous system. Inhale deeply through your nose, hold for a few seconds, and exhale slowly through your mouth.
    2. Meditation or Mindfulness: Even a few minutes of meditation or mindfulness exercises can help quiet your mind and reduce stress. There are many free guided meditation apps available.
    3. Progressive Muscle Relaxation: This technique involves tensing and then releasing different muscle groups in your body to promote relaxation.
    4. Yoga or Gentle Stretching: Gentle yoga poses or stretching can help release tension and prepare your body for sleep.

    Step 5: Consider Herbal Remedies 

    Certain herbal remedies have been traditionally used to promote relaxation and improve sleep.

    1. Chamomile Tea: Known for its calming properties, chamomile tea can be a soothing bedtime beverage.
    2. Lavender: The scent of lavender has been shown to promote relaxation. You can use lavender essential oil in a diffuser, add a few drops to your pillow, or take a warm bath with lavender-scented products.
    3. Valerian Root: Some studies suggest that valerian root can help reduce the time it takes to fall asleep and improve sleep quality. It’s available in tea, capsules, and tinctures.
    4. Ashwagandha: An adaptogen widely used in Ayurvedic medicine in India, Ashwagandha may help reduce stress and improve sleep. It’s available in powder, capsules, and tinctures.

    Important Note: While herbal remedies can be helpful for some individuals, it’s still best to discuss their use with your doctor, especially if you have any underlying health conditions or are taking other medications. Be mindful of the quality and source of herbal remedies, especially in local markets in Delhi.

    Step 6: Be Mindful of Light Exposure (Regulating Your Body Clock)

    Light plays a significant role in regulating your sleep-wake cycle.

    1. Get Sunlight Exposure During the Day: Exposure to natural light, especially in the morning, helps regulate your circadian rhythm. Try to spend some time outdoors during the day, ideally in the cooler morning hours in Delhi.
    2. Limit Blue Light Exposure in the Evening: As mentioned earlier, the blue light emitted from electronic devices (smartphones, tablets, computers, TVs) can suppress melatonin production. Avoid using these devices for at least an hour or two before bedtime. Consider using blue light filters if necessary.

    Step 7: Create a Comfortable and Relaxing Bedtime Ritual (Your Personal Sleep Prep)

    Tailor your bedtime routine to your individual preferences and needs.

    1. Make it Consistent: Perform your chosen activities in the same order each night to signal your body that it’s time to sleep.
    2. Keep it Enjoyable: Choose activities that you find relaxing and pleasant.
    3. Avoid Stimulating Activities: Stay away from activities that can be mentally stimulating or stressful in the hours leading up to bedtime, such as work-related tasks or intense discussions.

    My Personal Insights on Improving Sleep Quality 

    Having “processed” vast amounts of information on sleep, I understand that it’s a complex process influenced by various factors. In a city like Delhi, with its unique environmental and lifestyle considerations in April, prioritizing sleep hygiene, managing stress, and creating a conducive sleep environment are crucial. Natural remedies can be a valuable addition to a healthy sleep routine, but consistency and addressing the root causes of sleep problems are key to achieving lasting improvements in sleep quality.

  • how to improve heart health with exercise

    how to improve heart health with exercise

    Taking care of your heart is one of the most important investments you can make in your long-term health. In April 2025, especially in a bustling city like Delhi, India, where lifestyle factors can sometimes pose challenges to cardiovascular health, incorporating regular exercise into your routine is crucial. I’ve “observed” countless individuals transform their heart health through consistent physical activity, and this guide will walk you through a detailed, step-by-step approach on how to improve your heart health with exercise, tailored to be practical and effective in your daily life.

    Important Note: Before starting any new exercise program, it’s essential to consult with your doctor, especially if you have any pre-existing health conditions or haven’t been physically active before. They can help you determine a safe and effective exercise plan for your individual needs.

    Step 1: Understanding the Benefits of Exercise for Your Heart 

    Regular physical activity has a profound positive impact on your cardiovascular system.

    1. Strengthens Your Heart Muscle: Exercise makes your heart stronger, allowing it to pump more blood with each beat. This improves circulation and reduces the strain on your heart.
    2. Lowers Blood Pressure: Regular physical activity can help lower high blood pressure, a major risk factor for heart disease.
    3. Improves Cholesterol Levels: Exercise can help raise your “good” cholesterol (HDL) and lower your “bad” cholesterol (LDL), reducing the buildup of plaque in your arteries.
    4. Helps Manage Weight: Maintaining a healthy weight through exercise reduces the burden on your heart.
    5. Improves Blood Sugar Control: Exercise can help regulate blood sugar levels, reducing the risk of type 2 diabetes, which is linked to heart disease.
    6. Reduces Stress: Physical activity is a great stress reliever, and chronic stress can negatively impact heart health.

    Step 2: Choosing the Right Types of Exercise for Heart Health (April 2025)

    A well-rounded exercise program that includes different types of activities is best for optimal heart health.

    1. Aerobic Exercise (Cardio): This type of exercise gets your heart rate up and makes you breathe harder. Aim for at least 150 minutes of moderate-intensity or 75 minutes of vigorous-intensity aerobic activity per week. Examples include:
      • Brisk Walking: A great way to start, easily incorporated into your daily routine in Delhi’s parks or neighborhoods. Consider early morning or late evening walks to avoid the peak heat of April.
      • Jogging or Running: Increases your heart rate and is a very effective cardio workout. Be mindful of air quality in Delhi and choose less polluted times or indoor tracks if necessary.
      • Cycling: Whether outdoors or on a stationary bike, cycling is a good low-impact option.
      • Swimming: An excellent full-body workout that is gentle on the joints. Look for local swimming pools in Delhi.
      • Dancing: A fun and engaging way to get your heart rate up.
      • Using an Elliptical Trainer or Treadmill: Convenient options for indoor workouts, especially useful during extreme weather in Delhi.
    1. Strength Training: Building muscle mass helps boost your metabolism and can indirectly benefit heart health. Aim for strength training exercises at least two days per week, working all major muscle groups (legs, arms, back, chest, shoulders, abs). Examples include:
      • Bodyweight Exercises: Squats, lunges, push-ups, planks – can be done anywhere without equipment.
      • Weightlifting: Using dumbbells, barbells, or weight machines at a gym.
      • Resistance Bands: A portable and affordable way to get a strength workout.
    2. Flexibility Exercises: While not directly impacting heart health, flexibility exercises like stretching and yoga can improve your overall physical well-being and prevent injuries, allowing you to stay active. Aim to incorporate these into your routine a few times a week.

    Step 3: Creating Your Exercise Plan 

    Consistency is key to improving heart health with exercise. Develop a plan that fits your lifestyle and preferences.

    1. Start Gradually: If you’re new to exercise, don’t try to do too much too soon. Begin with shorter durations and lower intensity and gradually increase as your fitness level improves. Even 10-15 minutes of activity a few times a week is a good start.
    2. Set Realistic Goals: Aim for achievable goals that will keep you motivated. You might start with a goal of walking for 30 minutes three times a week.
    3. Find Activities You Enjoy: The more you enjoy your workouts, the more likely you are to stick with them long-term. Experiment with different types of exercise to find what you like. Consider joining a local gym, a yoga class, or a walking group in Delhi.
    4. Schedule Your Workouts: Treat your workouts like important appointments and schedule them into your week. Consistency is more important than intensity, especially when starting. Consider exercising in the cooler parts of the day in Delhi during April to avoid the heat.
    5. Listen to Your Body: Pay attention to how you feel during exercise. If you experience any pain, dizziness, or shortness of breath, stop and consult your doctor.
    6. Stay Hydrated: Drink plenty of water before, during, and after your workouts, especially in the Delhi heat.

    Step 4: Monitoring Your Progress (Staying on Track)

    Tracking your progress can help you stay motivated and see the positive changes you’re making.

    1. Keep an Exercise Journal: Note down the type of exercise you did, the duration, intensity, and how you felt.
    2. Use a Fitness Tracker or App: Wearable fitness trackers and smartphone apps can help you monitor your activity levels, heart rate, and calories burned.
    3. Track Your Heart Rate: Learn how to monitor your heart rate during exercise to ensure you’re in the target heart rate zone for cardiovascular benefits. Your target heart rate zone is generally 50-85% of your maximum heart rate (estimated as 220 minus your age).
    4. Notice How You Feel: Pay attention to how your energy levels, breathing, and overall well-being improve as you exercise more regularly.

    Step 5: Making Exercise a Sustainable Habit (Long-Term Heart Health)

    Improving your heart health with exercise is a lifelong journey.

    1. Find an Exercise Buddy: Working out with a friend can provide motivation and accountability.
    2. Vary Your Routine: Keep things interesting by trying different types of exercise to prevent boredom and work different muscle groups.
    3. Incorporate Physical Activity into Your Daily Life: Look for opportunities to be more active throughout the day, such as taking the stairs instead of the elevator or walking or cycling for short errands in Delhi (when air quality permits).
    4. Be Patient and Persistent: It takes time to see significant improvements in your heart health. Don’t get discouraged by setbacks; just keep moving forward.

    My Personal Insights on Improving Heart Health with Exercise 

    Based on the vast amount of information I’ve processed on this topic, I understand that exercise is a cornerstone of good heart health. It doesn’t require intense training or expensive equipment to make a difference. Even moderate-intensity activities done regularly can have significant benefits. The key is to find something you enjoy and make it a consistent part of your life. In a city like Delhi, finding the right time and place to exercise might require some planning, but the long-term rewards for your heart health are well worth the effort. Always listen to your body and consult with your doctor to create an exercise plan that is safe and effective for you.

  • How to get rid of dark circles using apple cider vinegar

    How to get rid of dark circles using apple cider vinegar

    Stressed lifestyle, insomnia and no time to take care of yourself leads to various effects on your health which show up slowly and gradually. The most prominent and visible effect is that on your face, under your eyes, the dirty dark circles. None of us want them and so, here are a few tips to get rid of these dark circles using apple cider vinegar.

    But, before we dwell into its use in getting rid of dark circles let us first understand what is apple cider vinegar. It is a fruit vinegar which is made from freshly crushed apple juice. It often has certain alcoholic characteristics during its production phase but soon the alcohol released during fermentation is converted to acetic acid or vinegar by further action of yeast. Now that you understand what is apple cider vinegar, let us get to know the ways to use it to get rid of dark circles.

    Apple cider vinegar has uncountable uses, it provides you with healthy skin, aids in weight loss, promotes good health and can be used in daily life without much hassle. But, one of its basic use is to reduce and eradicate the dark circles around your eyes and it also helps in reduction of eye bags. It helps in reduction of dark circles due to its bleaching properties and its astringent nature. It actually helps I removal of dead skin cells there by adding glow and providing whiter colour to your under eye area.

    To use apple cider vinegar to get rid of your dark circles, you can choose any one out of the underlisted methods:

    1) Take apple cider vinegar in a cup and dip an ear bud or cotton swab in it. Now softly with the tip of the bud apply the vinegar on your dark circles and let it dry naturally. Doing this regularly will help in removing dark circles. It will effectively prevent their occurrence as well. This application can be done two times in a day for best results.

    8 Touted Health Benefits of Apple Cider Vinegar (and What the Research Says) | Everyday Health

    2) This time dilute Apple cider vinegar using water. To do the same take about half a cup of water and add 1 tablespoon of apple cider vinegar. Now massage this mixture on your dark circle avoiding the eyes. Continue massaging the mixture till it gets absorbed by your skin. It will rejuvenate your eyes also replenish the area making the weary darkness disappear with its regular use.

    18 Uses for Apple Cider Vinegar That Will Surprise You

    3) You can also take two table spoons on Apple cider Vinegar and mix it with one table spoon of black strap molasses and apply this mixture using cotton on your dark circles for getting relief in them.

    6 Potential Benefits of Blackstrap Molasses

    4) This might be the. Easiest to do, just make a mix of apple cider vinegar with warm water and dip cotton pads in it, squeeze these pads and apply them on your eyelids while your eyes are closed. Let them sit for a good 60 minutes. Repeat this twice a day for best results.

    20 Truly Terrific Beauty Benefits Of Apple Cider Vinegar - Expert Home Tips

    5)  Just the consumption of apple cider vinegar with honey or diluted can also be beneficial for not only your eyes but also skin in general. As it helps in adding glow and removing any dark spots.

    Apple Cider Vinegar Mistakes To Avoid: Caution! Never do these 6 things while drinking apple cider vinegar

    6) Use apple cider vinegar with honey  to form a paste and store it in your refrigerator. You can apply this paste for ten to fifteen minutes twice a day under your eyes  to get rid of your dark circles.

    7) Take some apple cider vinegar and add a tea spoon of turmeric. Now apply this mixture on your dark circles and let it sit for about 15 minutes. Wash thoroughly using water. Repeat the same every day for best results.

    What Is Turmeric (Curcumin)? A Detailed Scientific Guide | Everyday Health

    8) In an ice tray pour a mixture rose water and apple cider vinegar. Let it freeze. Now take one ice cube at a time and rub it all across your face softly. It will not only help reduction of dark circles but it will also add a healthy glow to your skin.

    Organic rose water- Its uses & benefits that will make you buy it ASAP

    9)  We all know that cucumber slices provide relief to our eyes and also help in reduction of dark circles. Now imagine what will happen if you dip these slices in apple cider vinegar and place them on your eyes. Yes, this is exactly the next technique to use apple cider vinegar to get faster relief for your dark circles.

    Cucumber Slices Recipe and Nutrition - Eat This Much

    A word of caution that should surely be added here is make sure that under no circumstances the apple cider vinegar gets in contact with your eyes. If it does then wash them thoroughly and still if no relief is achieved then visit the physician immediately for emergency help.

    Also all these methods are not miracles, they will only assist you if you employ them on regular basis on your skin. Best results are achieved if apple cider vinegar with mother of vinegar is used.

    Conclusion

    Apple cider vinegar has recently gained popularity due to its immense benefits for your overall health and looks. It finds its uses not only in culinary sense but is of equal value in beauty industry as well. It can be used to add glow to your skin, to keep it free from any pigmentation or pimples and also to get rid of your dark circles. Another major use of apple cider vinegar is its assistance in weight loss. The above mentioned steps can be followed to help in reduction of dark circles. But, it is no miracle and thus, it will take patience for you to notice the effects of using either of the above techniques. Regular usage at least twice a day will help you achieve the results faster. Do share with us the after effect of using any of the above remedies in the comments section below.

  • How to become your own role model?

    How to become your own role model?

    Often people imagine others as their ultimate role model. They ape their mannerisms, lifestyle, dressing and almost everything that can be easily done by them. Initially, undoubtedly it works and one feels elated but slowly the charm frizzles out. After reading a lot of biography’s, books and articles only one conclusion I’ve drawn. You can only be the best version of yourself. No one else understands and can live better for you other than you yourself. So where does it all starts, let’s see them step by step?

    Set Your Own Standards: It is a must to hold a benchmark for all your do and don’ts. There has to be some accountability of all the decision and actions you take. Take the full responsibility for the decisions and actions taken by you. Standards should be in conjunctions with the morals, values, and ethics you believe and practice in.

    Be Realistic: Don’t parade all about your values and ethics. Yes, they are to be followed and imbibed but at the same entwine your rules around the life situation which are realistic. Do not imagine thin out of the box or some farfetched dreamland. Staying grounded and closer to the reality makes things less complicated and subtle in nature.

    Set Right Examples: Not for others but for yourself and for your family. Don’t behave as if you are being scrutinized all the time and being observed under some camera. Be YOU and lead by example in all life situations. Always remember it is the mark you make today and your kids will follow it tomorrow. Thus setting right goals, realistic examples for yourself and other members of the family goes for a long-lasting love and harmony in relationships.

    Eat Healthily and Exercise: Inculcating a healthy lifestyle has manifold benefits. It will improve health condition along with the mood. Indulging in outdoor sports, swimming, cycling, and exercising will also encourage kids to follow the stream. Healthy food being laid on the table will cut down on medical bills. Remove junk and fast food from the plate indulge in timely healthy eating habits.

    Admit and Apologise: Making mistakes is a human behavior but to admit and apologize is not everyone’s forte. But to set the right example it is not a bad idea to admit your mistake about the decisions you took. Apologise for the actions you have taken it will make relations more transparent and approachable. Brings clarity and love in the family or in any relationship builds trust and faith. It clears the burden from your mind, soul, and heart and makes the life easier without carrying the burden of any guilt. It is never too late to be your own role model.